What's going on

New socks:These are a new pair of Bavarian (Austrian?) twisted-stitch socks. Please note that I am knitting both of them simultaneously. I have a very good reason for doing so -- and that reason is that I am simply dying to design/knit a new pair of Bavarian (Austrian??) twisted-stitch gauntlets. The fact that this has entered the house isn't helping my willpower much.Yes, it's an innocent enough (boring enough?) ball of grey yarn, but it's calling to me. Hence both sets of US 4 dpns are busily holding two socks-in-progress. No gauntlets until at least one (preferably both) socks are complete!

Of course, temtpation lurks in every gauge. I've been fending these off for quite some time:VINTAGE SELBU MITTENS. The reason I haven't dived into these yet is twofold: firstly, that I've been too busy designing and mitten pattern-writing, and finally, because it has taken me so long to settle on colours. I may have to take a cue from the sample and go with the ivory/off-white option, in the interests of matching my soon-to-be new scarf.

Ah yes, the scarf. It occurred to me this afternoon that I am beyond weary of all of the handknit scarves that I currently have in my possession, and that I simply can not bear to wear them again this season. Hence, the search for this year's Perfect Scarf is on.

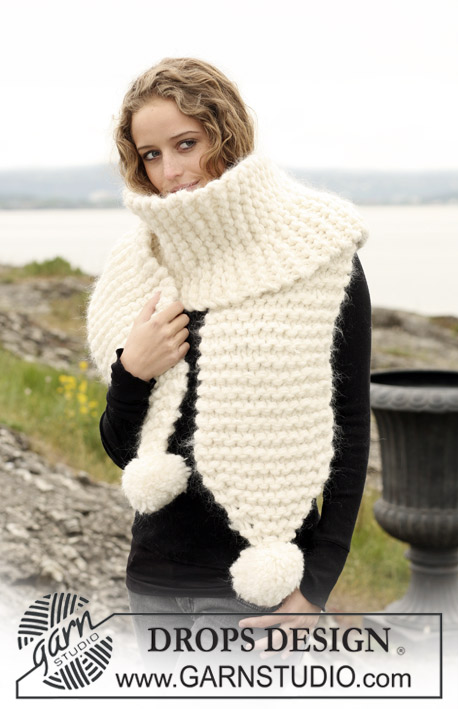
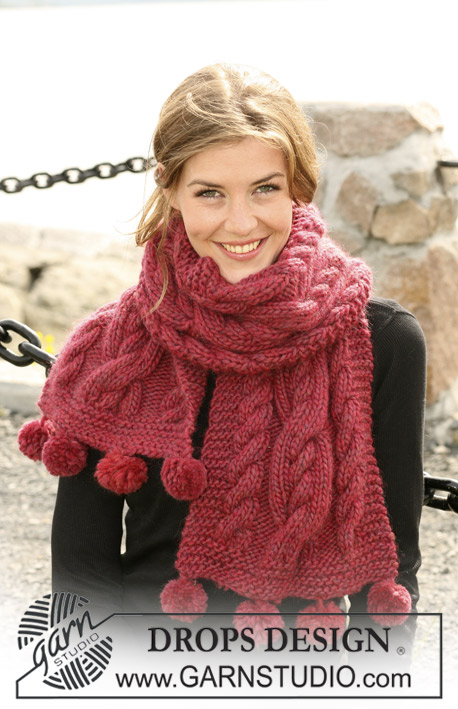
As it currently stands, the Perfect Scarf is a veritable snowdrift of an accessory. I figure I'll go big and cushy (and maybe hit something close to couture? Maybe??) seeing as I have two skeins of this on hand, and no other plans for it:Yes. Now to get knitting.

Carrots and Beets Mittens

Yes, I come bearing more new mittens! This time around it's the Carrots and Beets Mittens, a lovely little pair that I don't think I've blogged about before now. Just call them stealth mittens.Winter is long, but these veggies are sweet! Keep your hands warm this season with these mittens adorned with bands of cute carrots and beets.

As has been the case with the last handful of new mittens lately, this motif is also available in sock form. You may recall the Carrots and Beets socks, yes? Also as usual, you can pick up the Carrots and Beets mittens right over here on Ravelry, and the socks are available there as well. My poor, long suffering Etsy shop will be receiving its long-overdue update tonight (hopefully,) at which point the pattern (as well as the others that are not yet in there) will be added. Yep.And now for the rest:

The 4-page Carrots and Beets Mittens .pdf includes addtional instructions for making them as fingerless mittens. There are many ways to consume these veggies!

Size: Women’s Medium (or any hand that is 8” in circumference.)

Gauge: 9 stitches = 1 inch (2.5 cm) in Stockinette st.

Yarn: One ball of Knit Picks’ Palette (231yd / 50g) in each of the following colours: Bittersweet Heather (Main Colour -- MC,) and the following Contrast Colours: Clover (Contrast Colour A – CCA,) Sweet Potato (Contrast Colour B -- CCB,) Ivy (Contrast Colour D - CCD) and Fairy Tale (Contrast Colour E -- CCE.) Alternately, any other fingering yarn in these colours or colours of your choice may be used. A 15” piece of waste yarn of the same weight in a contrasting colour to hold the thumb stitches is also required.

Needles: One set of five (5) double pointed needles in US 1 (2.25 mm) or size necessary to obtain gauge.

Notions: A stitch marker to mark beginning of round (optional,) and a sewing needle to weave in ends.

Skills Needed: Increasing and decreasing, knitting in the round, stranded knitting, twisted stitches, and chart reading.

Enjoy the Veggies!

Take me to your ROBOMITTS

Attention, humans: ROBOMITTS have been spotted in the area. Take cover (or don't!)Perhaps you are already familiar with the ROBOSOCKS? Maybe you'd like to side with the ROBOMITTS? If so, the pattern is waiting for you here, on Ravelry and will shortly be available in my Etsy shop.Here's what you'll need to know:

The 5-page ROBOMITTS .pdf includes addtional instructions for making them as fingerless mittens. The robots just keep going and going...

Size: Women’s Medium (or any hand that is 8” in circumference.)

Gauge: 9 stitches = 1 inch (2.5 cm) in Stockinette st.

Yarn: One ball of Knit Picks’ Palette (231yd / 50g) in each of the following colours: Ash (Main Colour -- MC,) and Raspberry Heather (Contrast Colour – CC.) Alternately, any other fingering yarn in these colours or colours of your choice may be used. A 15” piece of waste yarn of the same weight in a contrasting colour to hold the thumb stitches is also required.

Needles: One set of five (5) double pointed needles in US 1 (2.25 mm) or size necessary to obtain gauge.

Notions: A stitch marker to mark beginning of round (optional,) and a sewing needle to weave in ends.

Skills Needed: Increasing and decreasing, knitting in the round, stranded knitting, twisted stitches, and chart reading.

Enjoy the robots! I'm off to go put the finishing touches on the Winter Veggies mitten pattern.

Owlmittens came out last night!

They're out! The Owlmittens are out! Yes, these are the mitteny equivalents of my Owlsocks -- remember those?Your copy of the 5-page .pdf is waiting for you right over here on Ravelry! Watch for the pattern to turn up in my Esty shop later this afternoon.The best part? The pattern comes with instructions and charts to make the Owlmittens as fingerless Owlmittens -- these are owls for all seasons!

And now for all that Owly info:

Size: Women’s Medium (or any hand that is 8” in circumference.)

Gauge: 9 stitches = 1 inch (2.5 cm) in Stockinette st.

Yarn: One ball of Knit Picks’ Palette (231yd / 50g) in each of the following colours: Camel Heather (Main Colour -- MC,) and Autumn Heather (Contrast Colour – CC.) Alternately, any other fingering yarn in these colours or colours of your choice may be used. A 15” piece of waste yarn of the same weight in a contrasting colour to hold the thumb stitches is also required.

Needles: One set of five (5) double pointed needles in US 1 (2.25 mm) or size necessary to obtain gauge.

Notions: A stitch marker to mark beginning of round (optional,) and a sewing needle to weave in ends.

Skills Needed: Increasing and decreasing, knitting in the round, stranded knitting, twisted stitches, and chart reading.

That's it! Enjoy the owls...the ROBOTS are next!

New free pattern -- Quo Vadis

Ok, so it took me a few days longer than I initially expected it to, but it's up and out. Grab your free copy of the Quo Vadis mitten pattern here on Ravelry or right over here.The Quo Vadis mittens are my early holiday gift to all of you lovely knitters. Happy Holidays 2009!

These simple, elegant, stash-busting mittens are worked in a worsted-weight yarn – perfect for those last-minute, unexpected gifts (or for yourself!)

Use as many (or as few) colours as you’d like to create your own unique mittens.

Enjoy the mittens...and keep an eye out for those Owls and Robots that will be heading your way soon!

A quick one

Just so you nice people can't accuse me of keeping things secret, this is what I did today:I'm not even making that up -- I did all of this today. Usually I split the mittening up over a two- or even three-day stretch, but I just felt like working so I went with it. But I digress.

The astute among you may have noticed that this is the mitteny equivalent of the ROBOSOCKS. These are, indeed, the ROBOMITTS -- and yes, those are Pink Robots, for those of you familiar with the song. I had the chance to see The Flaming Lips a few years ago (in Detroit, as usual,) and it was (as promised!) an Epic Experience.

Owlmittens (and Quo Vadis)

The Quo Vadis mittens are done:Yep, all done. And the pattern will be out any day now (tomorrow? There's a good chance!) The best part? Quo Vadis is my gift to all you lovely knitters for the upcoming holiday season, so it's going to be a freebie. Everybody loves a freebie!

And the Owlmittens aren't that far behind:I'll be polishing these off tomorrow. The pattern shouldn't be too much longer, either, and it will also include instructions for making them as fingerless mittens.

It never ends -- no, really, it doesn't.

Quo Vadis?

I have a belly full of barbecue and a mitten that needs a thumb......and now I'm sleepy. This mitten, which I've taken to calling Quo Vadis, was mostly knit today while reading and listening (yes, I do all three at the same time.) I can not recommend either that book or that record strongly enough, as I love them both to distraction. Who knew that barbecue brought out the hyperbole in me?

I'm off to make tea and knit a thumb.

Ribbon Mittens are out!

As hinted at in yeserday's post, the Ribbon mitten pattern is now available!Simple mittens made very fancy by using the Estonian Roositud inlay technique -– a quick method that is the simplest colourwork technique that you’ll ever learn. If you can knit Stockinette in the round and wrap stitches, you can make these mittens!

Copies are available right over here on Ravelry. They'll also be turning up in my Etsy shop later on today. You say you're not familiar with this Estonian Roositud inlay thing? Not a problem! Check out the tutorial that I've prepared right over here.Now for the usual suspects:

Size: Women’s medium (or any hand that is 7.5” in circumference.)

Gauge: 6 stitches/8 rows = 1 inch (2.5 cm) in Stockinette st.

Yarn: 1 skein of Patons Classic Wool (223 yd/100 g) in Leaf Green (MC) and partial skeins (15 yds of each,) of three different contrasting yarns of a similar weight. The contrasting yarns used here are Patons Classic Wool (223 yd/100 g) in Aran (CC1) and Knit Picks Merino Style (123 yd/50 g) in Strawberry (CC2) and Rhubarb (CC3.)
**NOTE: Knit Picks Merino Style is no longer available in the Strawberry and Rhubarb colourways. The following substitutions can be made: partial skeins (15 yds of each) of Patons Classic Wool (223 yd/100 g) in Bright Red (CC2) and That’s Pink (CC3.)

Needles: One set of five (5) double pointed needles in US 3 (3.25 mm) or size necessary to obtain gauge.

Notions: A 10” length of yarn in a comparable weight (but contrasting colour) to hold thumb stitches, a stitch marker to mark beginning of round (optional) and a sewing needle to weave in ends.

Skills Needed: Knitting in the round, decreasing, Roositud inlay, twisted stitches, and chart reading.

I should also mention that these mittens work up fairly quickly, too. They might be the solution to your holiday knitting problems!

Roositud Inlay Tutorial


So you’ve been eyeing the Ribbon mittens and thinking you might like to make a pair but you have no idea about this whole Roositud inlay thing? Maybe you’d just like to add a new technique to your knitters’ skill set? Perhaps you just like reading tutorials? Whatever the reason, have I got a treat for you. In preparation for the release of the Ribbon mittens, here’s a tutorial detailing how to work the Roositud inlay technique.

A quick note on the technique: Roositud is an Estonian inlay technique where stitches are wrapped (not knit) with contrasting yarn to create a patterned effect. The result looks like embroidery, but it done as the object (usually a mitten or a sock) is being worked. In this respect it’s preferable to embroidery since one doesn’t have to worry about sewing in tight places (say, a mitten tip or the end of a thumb.) It’s also one of the best instant-gratification techniques I’ve come across, since one can watch the pattern grow as the object does.


Another great thing about this technique is that it might be the easiest kind of colourwork ever. In Roositud, the knitter will only ever be required to knit in plain Stockinette stitch, and the stitches will be wrapped (inlaid) in pattern to create the colourwork motif. Easy, and quicker than one would think! Regular Fair Isle (and other colourwork techniques where the contrast colour(s) are actually knit in) require the knitter to carry the colours that are not currently in use behind the work until they’re needed again. This results in what is called floats – those stretches of unused yarn. There are no floats in Roositud! With it, the knitter is able to work small, isolated and get this – vertical! – bits of colourwork wherever it’s needed. The other good thing about it is that one can use as many different colours as one wants per row, stripe, whatever. In other colourwork techniques, knitting with more than three colours per row can be a real trick.

Sure, it may be a little fiddly at first (and what new technique isn’t?) but it didn’t take me long to pick up at all. A little practice is all you’ll need to get going.


Download the .pdf here: Roositud Inlay Tutorial